Monday, August 3, 2015

How to configure SSL for Admin server when configured multiple authenticators

Symptoms:

We are getting following errors when we enabled SSL port and disabled non-SSL port for Admin server and try to check-in document in WCC:-

<oracle.ods.virtualization.engine.backend.jndi.DefaultAuthenticator.BackendJNDI> <LIBOVD-60143> <[#DefaultAuthenticator]  Unable to create connection to ldap://[localhost]:7002 as null.
javax.naming.CommunicationException: simple bind failed: localhost:7002 [Root exception is javax.net.ssl.SSLException: java.lang.RuntimeException:
Unexpected error: java.security.InvalidAlgorithmParameterException: the trustAnchors parameter must be non-empty]
        at com.sun.jndi.ldap.LdapClient.authenticate(LdapClient.java:218)
         at com.sun.jndi.ldap.LdapCtx.connect(LdapCtx.java:2740)

Cause: 

When we configure Admin Server to communicate over SSL then defaultLDAP automatically configure to communicate over SSL protocol (LDAPS). In case of multiple authenticators, and one of them is configure to communicate over SSL, we need to put the corresponding LDAP server's root certificate in an additional keystore used by the virtualisation (LibOVD) functionality otherwise application is unable to establish connection with defaultLDAP (ldaps://localhost:7002).

Solution:
Pre-requisites: Before completing this task, make sure the following configurations:-
  • Configure the custom property called virtualize, and set its value to true.
  • Admin Server SSL port is not enabled. (*) 
  • Managed servers are down 

Steps:


    1. Create the keystore:
    a.      Set environment variables ORACLE_HOME, WL_HOME and JAVA_HOME.
    export ORACLE_HOME=/u01/app/oracle/product/middleware/WC1

    export WL_HOME=/u01/app/oracle/product/middleware/wlserver_10.3

    export JAVA_HOME=/u01/app/jdk1.7.0_65/
    b.      Setup the keystore by running libovdconfig.sh using -createKeystore option.
    Open a shell prompt and change the directory to <MW_HOME>/oracle_common/bin. Then, run the following command:
    ./libovdconfig.sh -host <AdminServerHostName -port 7001 -userName weblogic -domainPath  <DomainPath> –createKeystore
          Enter AdminServer password:[Enter weblogic password]
    Enter OVD Keystore password:[Enter a new password to secure a Keystore file]
    Once this command runs, we see two new credentials in the Credential Store and a new Keystore file called adapters.jks under <DOMAIN_HOME>\config\fmwconfig\ovd\default\keystores.
    1. Export the root certificate from the Admin Server SSL certificate or LDAP directory.
    2. Import the root certificate to the libOVD keystore using the keytool command:
    $JAVA_Home/bin/keytool -import -keystore adapters.jks -storepass <KeyStore password> -alias <alias of your choice> -file <Admin Server Certificate filename>
    1. Enable SSL port and disabled non-SSL port of Admin server. (*)
    2. Restart Admin Server and start all the managed servers.

    * No need for this step if we are just configuring multiple authenticators with non-defaultLDAP (AD/OID) is communicating over SSL

    Reference : Above steps are documented in Oracle BI security Guide: http://docs.oracle.com/cd/E21764_01/bi.1111/e10543/ssl.htm#BIESC6078

    Thursday, June 18, 2015

    How to propagate ECID from OHS to Weblogic Server

    What is ECID

    Execution Context ID (ECID) is a unique value assigned to each request processed by the Application Server and is used for any subsequent processing spawned from that initial request. With so many discrete components in Fusion Applications this single value is what can be used to tie the processing flow together.

    After executing steps mentioned below, you will be able to see single ECID for one request in all the layers (OHS, Weblogic, WebCenter Portal, SOA etc) 

    Enable the ECID and cookies logging in OHS
    a. Make a backup of the httpd.conf file (in case you haven't).
    This file should be located here:
    [WEBTIER_INSTANCE]/config/OHS/ohs1
    For example, in my case:
    /u01/app/oracle/product/Middleware/11.1.1.6/asinst_2/config/OHS/ohs1
    b. Edit the httpd.conf file.
    c. Locate the "LogFormat" directive.
    It should look like this:
    LogFormat "%h %l %u %t \"%r\" %>s %b" common
    d. Modify the section as follows to include the Oracle ECID and timing metric:
    LogFormat "%h %l %u %t \"%r\" %>s %b ecid:%E:%R Cookie=%{Cookie}i Set-Cookie=%{Set-Cookie}o [%T (secs)]" common
    e. Save the changes.
    f. Stop the OHS
    g. Clean all the logs from the: /data/app/admin/ohs1/diagnostics/logs/OHS/ohs1/*
    h. Start the OHS.
    Verification:
    tail –f access_log
    172.21.16.1 - - [17/Feb/2015:16:01:13 +1100] [ecid: 0053o6N^T6NBX7P6yfyWMG0007iY00000E:0] [ecid: -] Cookie=JSESSIONID=X9KVxQQM3cfvjuYVERKYIYn3OO49-ydBezDUpVHktP7dX7uMt3IW!-647353198; _WL_AUTHCOOKIE_JSESSIONID=CKUfa0-SVk3CPMHPIpgl; _ga=GA1.3.101510753.1424135093; __utmc=5569967; __utmz=5569967.1424142043.1.1.utmcsr=(direct)|utmccn=(direct)|utmcmd=(none); BIGipServerADP_WEBCTR_PORTAL_TEST2_tcp8892_pool=1376851372.48162.0000; __utma=5569967.101510753.1424135093.1424142043.1424145235.2; __utmb=5569967.17.10.1424145235; BIGipServerADP_TEST2_http_pool=1628509612.20480.0000 Set-Cookie=- "GET /portal/faces/oracle/webcenter/portalapp/pages/view1.jspx?_afrLoop=2157114934181138&_afrWindowMode=0&_afrWindowId=null HTTP/1.1" 200 6889 [0 (secs)]

    Enable the ECID and Cookie logging in WLS (WCP, SOA, WCC, BPM etc)
    To see the ECID on the WLS access.log, it helps to correlate better the logs and the flow.
    a. Navigate to the WLS Console
    b. Select Environment->Servers
    c. Select the server you wish to configure
    d. Click the "Logging" tab
    e. Click the "HTTP" tab
    f. Expand the "Advanced" section
    g. Set in the "Format field" from the dropdown box "Extended", not "Common" (you may need to click on the "Lock & Edit" button - for Production mode)
    h. Add "s-ip c-ip sc(X-ORACLE-DMS-ECID)" and/or "sc(Set-Cookie) cs(Cookie) time-taken" to the Extended Logging Format Fields  (by default is: date time cs-method cs-uri sc-status)
    Example:
    From : date time cs-method cs-uri sc-status
    To:
    s-ip c-ip date time sc(X-ORACLE-DMS-ECID) cs-method cs-uri sc-status sc(Set-Cookie) cs(Cookie) time-taken
    i. Click the "Save" button (you may need to click on the "Activate Changes" button - for Product mode)
    j. Clean all the logs from the: <DOMAIN-HOME>/servers/<MANAGED-SERVER>/logs/*
    k. Restart the PORTAL managed server.

    Validation :
    [adpt2@adptlwc201 logs]$ tail -f access.log
    #Version:       1.0
    #Fields:        s-ip c-ip date time sc(X-ORACLE-DMS-ECID) cs-method cs-uri sc-status sc(Set-Cookie) cs(Cookie) time-taken
    #Software:      WebLogic
    #Start-Date:    2015-02-11      15:21:07
    RRWC101:8892     172.26.22.24  2015-02-11      15:21:07        -       GET     /       404     -       "__utma=79138256.2059891832.1403589756.1404189723.1405037343.3; lbsid=S05Iu6ltfn87UhA25dsM265yeH-GMj_5yL47KRVzNmtKybXhjNi2!964376355!1422854433134; _ga=GA1.3.2059891832.1403589756" 0.033
    Note: Please note that cookies-based-persistence is configured for top URL in the F5.

    You can configure above tasks for Weblogic Server, WebCenter Portal, WebCenter Content, SOA Suite and so on as far as it has Weblogic server as a middleware. 

    Friday, June 12, 2015

    Scaling support for different Oracle Fusion Middleware products


    Product
    Scale-up
    Scale-out
    Details
    Oracle WebCenter Portal
    Yes
    Yes
    Scale-up is only supported in case of Spaces or custom portal or Portlet managed server.
    Oracle WebCenter Content: Content Server
    No
    Yes

    Oracle WebCenter Content: Inbound Refinery
    No
    Yes

    Oracle WebCenter Content: Imaging
    Yes
    Yes

    Oracle WebCenter Content: Capture
    Yes
    Yes

    Oracle SOA/BPM Suite
    Yes
    Yes
    Scale-up is not supported in case of BAM server.
    Oracle Service Bus
    Yes
    Yes


    Scale-up: Adding managed server in Existing Nodes
    Scale-out: Adding managed servers New Nodes

    Reference:


    Thursday, February 5, 2015

    Oracle Weblogic Server : Enabling Log rotation of .out file

    There is no way to rotate out file from Oracle Weblogic Server Console or EM. To enable log rotation of the out log file on a Linux-based system, perform the following steps:
    1. Ensure that you have the logrotate binary installed on your operating system:
    ls /usr/sbin/logrotate
    2. Create a logrotate configuration file (for example, under /home/oracle/ scripts/logrotate.conf) with the following contents, setting [Domain] to your domain name:
    /home/oracle/SOA_DOMAIN/servers/soa_Srv01/logs/soa_Srv01.out {
    missingok
    copytruncate
    compress
    rotate=5
    size=5M
    }
    3. Create a logrotate status file (for example, under /home/oracle/scripts/ logrotate.status) with the following contents, setting [Domain] to your domain name:
    logrotate state -- version 2
    "/home/oracle/SOA_DOMAIN/servers/soa_Srv01/logs/soa_Srv01.out" 2012-1-1
    4. Add a new crontab entry by typing crontab -e and adding the following line:
    0,15,30,45 * * * * /usr/sbin/logrotate -s /home/oracle/scripts /logrotate.status /home/oracle/scripts/logrotate.conf

    This will check every 15 minutes to see if it is necessary to rotate the soa_server1.out standard out file based on the rules defined in the logrotate.conf configuration file. If new log files are added, you must ensure that they are added to the status file or they will not be rotated. This can be repeated for other managed servers as necessary.

    You can run the cron job manually to test it.
    /usr/sbin/logrotate -s 
    /home/oracle/scripts/logrotate.status /home/oracle/scripts/logrotate.conf


    Note: 
    You can apply above steps for any Oracle middlware products like Oracle Weblogic Server, WbCenter, SOA, BPM, IDM etc. As this is a linux cron job, I believe its not WLS version specific. 

    Monday, June 30, 2014

    Right strategy to set startup (JVM+NON-JVM) arguments and debug flags in Weblogic Server

    Note: This strategy is applicable in Oracle Weblogic Server, Oracle WebCenter Portal, Oracle SOA/BPM Suite, Oracle WebCenter Content and other Oracle products which are using Weblogic Server. 

    Step-by-step guide
    1. Finalise the right way
      There are two options to configure the JVM arguments:
      1. Via the "Server Start" tab at Administration Console , which is equivalent to the <server-start/> tag in config.xml
      2. Via the script file(startXXX.sh and setXXX.sh) under DOMAIN_HOME/bin/ of each server
      The problem of Option 1 is that the JVM parameters you put in <server-start/> via either Console or directly via config.xml will take effect only if you start the server from NodeManager. If you start the server via scripts, e.g., startWebLogic.sh, the parameters in <server-start/> in config.xml will be ignore.
      For Option 2, if you start servers via scripts under DOMAIN_HOME/bin, specifying JVM parameters will of course work. And as long as you set the StartScriptEnabled=true and StartScriptName=startWebLogic.sh, as required by the Enterprise Deployment Guide, starting servers via NodeManager will also call the same startWebLogic.sh scripts, and hence will pick up the JVM arguments you set there. So you are covered both ways.
      I would go with Option-2 as its covered both ways (nodemanager and startup script), its easy to change via Hudson or manually, its less risky approach as compared to config.xml.
    2. Finalise the right script file
      Now, we have chose the right way to specify JVM arguments. Next step is right file to specify the arguments. There are following two files to specify the JVM arguments and non-JVM arguments:-
      1. startWeblogic.sh
      2. setDomain.sh
      setDomain.sh is the right file to specify JVM arguments. This file is called by all startup script like startWeblogic.sh and startManagedServer.sh and nodemanager. Although, startWeblogic.sh is also called by startManagedServer.sh and nodemanager but setDomain.sh is the more logical choice due to its purpose and name.
    3. Finalise the right variable
      After choosing the right file, next step is choosing the right variables. There are a lot of variables that are related to JVM arguments: MEM_ARGS, USER_MEM_ARGS, JAVA_OPTIONS, JAVA_PROPERTIES etc. Oracle recommend to use the JVM memory settings (i.e. max and min heap size, PermGen size, etc) via variables USER_MEM_ARGS, and specifying any other JVM arguments or non-JVM arguments via JAVA_OPTIONS.
      The advantages of using USER_MEM_ARGS:-
      1. It will override the all standard memory arguments passed to JAVA.
      2. It will reflect right parameters in the server startup logs.
       
    4. Finalise the right location in the script file
      It is important to specify the USER_MEM_ARGS in the right location of setDomain.sh file. Following is the right location:-
      ==================================================================================
      #IF USER_MEM_ARGS the environment variable is set, use it to override ALL MEM_ARGS values:-
      USER_MEM_ARGS="-server -Xms2g -Xmx2g -XX:PermSize=256m -XX:MaxPermSize=512m -XX:+UseG1GC -XX:ParallelGCThreads=4"
      export USER_MEM_ARGS 
      if [ "$
      {USER_MEM_ARGS}" != "" ] ; then
      MEM_ARGS="${USER_MEM_ARGS}
      "
      export MEM_ARGS
      fi
      ==================================================================================
    5. Finalise the right way to specify the JVM arguments per server
      In such case you can script your JVM settings based on the server names in setDomainEnv.sh file like
      #In case of Admin Server
      if [ "${SERVER_NAME}" == "Admin_Server" ] ; then
      USER_MEM_ARGS="-Xms1024m -Xmx1024m"
      export USER_MEM_ARGS
      fi

      #if server name contains WLS_SERVER*
      if [[ "${SERVER_NAME}" == "WLS_SERVER*"]] ; then
      USER_MEM_ARGS="-server -Xms2g -Xmx2g -XX:PermSize=256m -XX:MaxPermSize=512m -XX:+UseG1GC -XX:ParallelGCThreads=4"
      export USER_MEM_ARGS
      fi
    6. Other recommendations about better management
      a. To be safe, it is better to move the all custom arguments (JVM + NON-JVM) to an external script (e.g. setCustomEnv.sh), and source this external script from setDomainEnv.sh file like:-
       
      -------------------------------------------------------------------------------------------------------------------------------------------------
      #IF USER_MEM_ARGS the environment variable is set, use it to override ALL MEM_ARGS values
       
      . ${DOMAIN_HOME}/bin/setCustomEnv.sh
       
      if [ "${USER_MEM_ARGS}" != "" ] ; then
      MEM_ARGS="${USER_MEM_ARGS}"
      export MEM_ARGS
      fi
             -------------------------------------------------------------------------------------------------------------------------------------------------
            b. To easy to manage and easy to change, we can put the setCustomEnv.sh at a shared file system. So you keep only one copy of it where all the JVM settings are centralised. This single copy of setCustomEnv.sh can be referenced by the individual setDomainEnv.sh for each server.

    All done. 

    Monday, March 17, 2014

    When we need a new Weblogic Domain?

    Depending on your particular business needs and system administration practices, you might decide to organize your domains based on criteria such as:

    1. If you have different applications using the same set products  but their maintenance requirements (patching, backup etc) are different.
    2. If you have different applications using the different version of the Oracle WebLogic Server software (Weblogic, WebCenter Portal, IDM, SOA etc)
    3. Different System administrators are responsible to manage different applications due to physical location, or branches of your business.
    4. Different applications are using different LDAP providers and your top requirements are Performance and Security
    5. If you want to segregate domains according to product components (WC, SOA, WL etc) or physical tier [Presentation, Integration, Service, Data etc] to achieve better maintainability
    6. If you want to segregate domains according to logical divisions of applications. For example internet applications and intranet applications OR financial applications and portal applications.


    Monday, September 2, 2013

    Oracle WebCenter 11g R1 PS7 (11.1.1.8.0) has been released and new features of WebCenter Portal 11g PS7

    Oracle WebCenter 11g R1 PS7 (11.1.1.8.0) has been released and includes the following products:
    • Oracle WebCenter Content 11g R1 (11.1.1.8.0)
    • Oracle WebCenter Portal 11g R1 (11.1.1.8.0)
    • Oracle WebCenter Sites 11g R1 (11.1.1.8.0)
    • Oracle Fusion Middleware Repository Creation Utility 11g R1 (11.1.1.8.0)

    About Oracle WebCenter Portal 11g R1 PS7

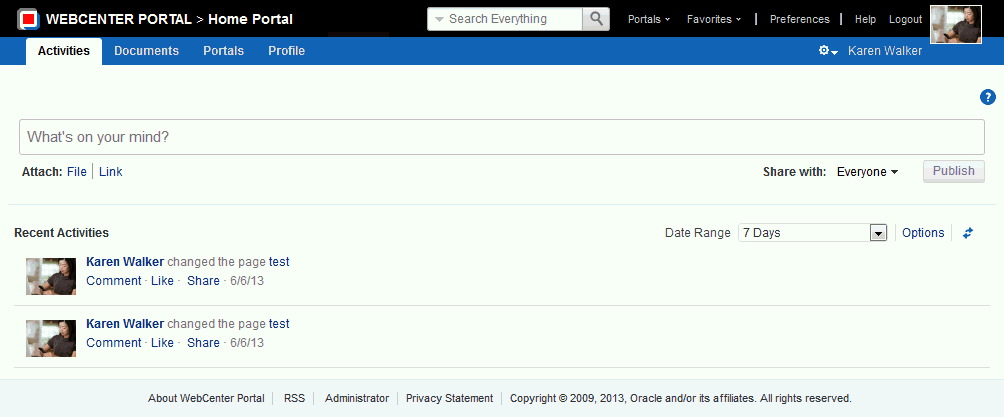
    WebCenter Spaces is no more in WebCenter Portal world, Spaces is renamed to Portal. Simply speaking, if you are running Spaces or you are running custom portal means you are just running portal. Here are some of the highlights of the release:
    1. Portal Builder: Browser-based Tools
    This release focused on optimizing the browser-based tools to make it faster and easier for non-technical users to create and manage the portal experience.  The key themes in these enhancements are intuitiveness and efficiency.  Examples include:
    • Streamlined interface to manage all portals and portal assets.
    • Quickly create new portals based on templates.
    • Quickly add pages and manage navigation structure when creating a new portal. 
    • Drag and drop components onto page from the resource catalog.
    • Save the resulting portal as a portal template. 
    • No more popup windows

    • 2. Multi-Channel Portal Experiences
      In this release, WebCenter Portal adds easy-to-use tools which allow for creation and management of tailored experiences for target client devices (smartphones, tablets, kiosks, etc.).  Some key features include seeded profiles for the most common devices such as iPad®, iPhone®, Samsung Galaxy S®, etc.  Ability for knowledge workers to create tailored experiences leveraging techniques such as adaptive/responsive design, variant pages and preview/emulate the experience within the browser.
      3. Performance
      This release has a number of performance gains including improved response time for initial page request, responsiveness of Portal Builder and increased transactions per second for server performance.
      4. Simplified deployment
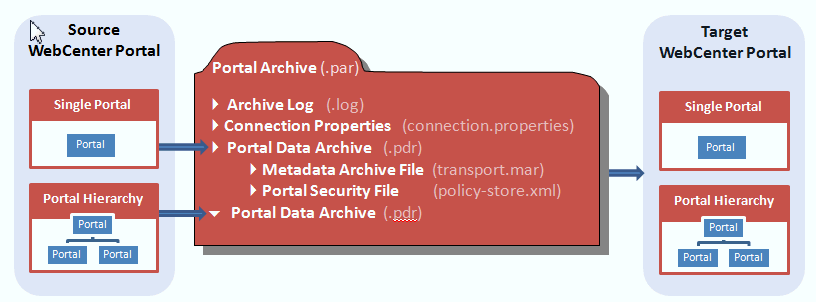
      You can use Portal Builder administration or WLST commands to export a portal archive (.par file) and then import portals from the file.
      5. Terminology changes
      Prior to 11g PS7 In 11g PS7
      WebCenter Portal: SpacesWebCenter Portal
      spaceportal
      space templateportal template
      resourceasset
      Oracle WebCenter Portal 11g R1 PS7 (11.1.1.8.0) Documentation : WebCenter Portal 11.1.1.8.0 Documentation