Monday, April 18, 2011

How to Install and Configure Oracle ECM 11G R1?

This post covers the quick installation overview of the Oracle Universal Content Management (Oracle UCM) and Oracle Inbound Refinery (Oracle IBR) product of Oracle Enterprise Content Management (ECM) Suite 11G R1(11.1.1.4.0). This guide does not contain steps of other ECM products like Oracle IRM, Oracle I/PM and Oracle URM.


Oracle UCM is a content server that store and manage several different types of contents (Web pages, PDF, Images, Videos etc).

Oracle IBR is a conversion server that manages file conversions for electronic assets such as documents, digital images, and motion videos. It also provides thumbnail functionality for documents and images and storyboarding for videos. You can use Oracle IBR to convert content items stored in Oracle Content Server.

Pre-requisites                                                                          
  1. Oracle Database 10g (10.2.0.4 or later) OR 11G (11.1.0.7.0 or later) (Required before RCU Schema Creation)
  2. Oracle Weblogic 11G R1 (Required before ECM Installation)

Installation Roadmap

Oracle UCM and IBR runs on Oracle Weblogic Server 11G. It is advisable that Oracle UCM and IBR must be installed in the same domain (i.e. WebCenter domain) so that domain related configurations can be utilized.

Installation of UCM and IBR consists of following steps:-

1.     Creation of UCM Schema

2.     Installation of Oracle ECM

3.     Creation of UCM and IBR Domain

4.     Configuration of UCM

5.     Configuration of IBR

Creation of UCM Schema

Run RCU to create the necessary install specific tables / schemas . This will create the schema with which UCM will be connected to DB. Follow the following steps as mentioned in the form of screens.


 In above screen, you can select existing prefix, if you have created schema for WebCenter or SOA or enter a new prefix.


 Enter a password for UCM_OCS Schema.


Installation of Oracle ECM

Install ECM 11G release 1 binaries in the respective Weblogic Middleware Home Directory. This will copy all the binaries to the location specified from where the installer picks up to deploy. Follow the following steps:-

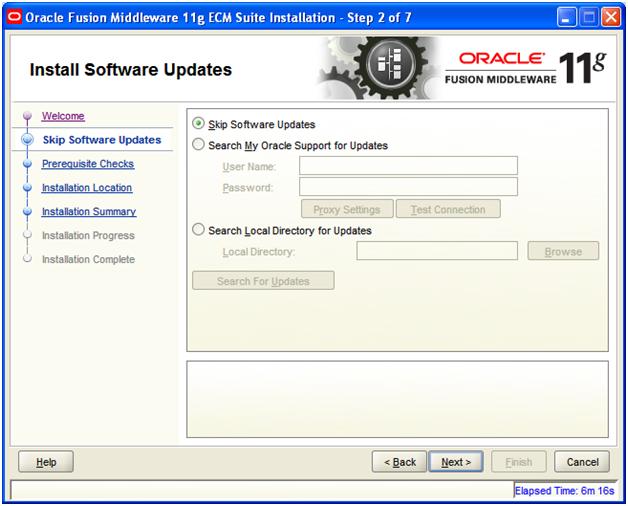


 Enter the patch of Weblogic Middleware home directory path you Weblogic created at the time of installation.


 During installation, it require path of disk2. Give path disk2/stage folder.


Creation of UCM & IBR Domain

This step will create a new domain where UCM and IBR applications and required files/libraries will be deployed. Follow the following steps:-


 Click the schema and enter Service, Host name, port, Schema owner (UCM_OCS) and schema password. Enter schema password that you entered at the time of UCM schema step of RCU.
 Make sure you see message “Test Successful”.


Configuration wizard will create following items:-
  1. New domain (ucm_domain)
  2. AdminServer running on port 7001
  3. UCM_Server running on port 16200
  4. IBR_Server running on port 16250

Configuration of Oracle UCM
  1. Start Admin server to have the new deployments initialized.
  2. Start the UCM Managed Server (UCM_Server) using command prompt. Might be you will face JRF and other libraries and classes loading issues. Its better to use command prompt first time using DOMAIN_HOME\bin\startManagedServer.cmd UCM_server.
  3. To test a newly set up Oracle UCM instance, by accessing Oracle Content Server:
            http://HostName:16200/cs


Login with admin user and password that you given at the time of Domain creation.
Perform the following steps for onetime Configuration of Content Server.

Change the Server Instance Name(OracleUCMServer) &  Server Instance Label (Oracle UCM Server).

 Once you completed post-install configuration, a new Menu with name “Oracle Content Server” will be created as shown in following screen:-

Restart the UCM_Server managed Server. Now, you have successfully installed and configured UCM.

Configuration of Oracle IBR
  1. Start the IBR Managed Server (i.e. IBR_server) using command prompt. Might be you will face JRF and other libraries and classes loading issues. Its better to use command prompt first time using DOMAIN_HOME\bin\startManagedServer.cmd IBR_server.
  2. To test a newly set up Oracle IBR instance:-
          http://HostName:16250/ibr


Login with admin user and password that you given at the time of Domain creation

Perform the following steps for onetime Configuration of IBR Server.

Change the Server Instance Name(IBRServer16250) &  Server Instance Label (Oracle IBR Server).

Once you completed post-install configuration, a new Menu with name “Oracle Inbound Refinery” will be created as shown in following screen:-

Restart the IBR_server manage server instance. Restart the UCM_server manage server instance.

Now, IBR can convert files to TIFF web-viewable files and JPEG image thumbnails. Other supported conversion types like PDF conversions, HTM conversion, Image/video asset conversions etc are installed but they are disabled, you can enable these types as well. For detail, how to enable other types, see http://download.oracle.com/docs/cd/E17904_01/doc.1111/e14495/configibr.htm#CIAFADFJ

To send jobs for conversion to Oracle IBR from Content Server, perform following steps:-
  1. Creation of Outgoing Provider: Follow steps as mentioned in http://download.oracle.com/docs/cd/E17904_01/doc.1111/e14495/configibr.htm#CIAGFDHJ
  2. Enabling IBR components on Oracle Content Server instance that use IBR for document conversion. (By default it is enabled) . Enable it using following steps mentioned in installation guide:- http://download.oracle.com/docs/cd/E17904_01/doc.1111/e14495/configibr.htm#CIAFGGFG
  3. Selecting File Formats to be converted by IBR: Use steps mentioned in http://download.oracle.com/docs/cd/E17904_01/doc.1111/e14495/configibr.htm#CIAEFBAE


In next post, I will explain how to integrate and configure UCM and IBR for Oracle WebCenter 11G.

Saturday, April 2, 2011

How to Install Oracle WebCenter 11G?

In this step-by-step guide, we will go through how to install Oracle WebCenter Suite 11G PS3 (11.1.1.4.0). When you install Oracle WebCenter, following components are installed with WebCenter:-
  • Oracle WebCenter Framework (Automatically installed)
  • Oracle WebCenter Space (Optional to install)
  • Oracle Portlet Producer(Optional to install)
  • Oracle WebCenter Discussion Server(Optional to install)
  • Oracle WebCenter Pagelet Producer(Optional to install)
  • Oracle WebCenter Analytics Collector(Optional to install)
  • Oracle WebCenter Activity Graph Engines(Optional to install)
  • Oracle WebCenter Personalization(Optional to install)

This installation does not include installation and configuration of other Oracle WebCenter services like Content Server, Communication Server, BPEL Server etc.

It is assumed that reader has some basic knowledge  of Oracle Weblogic Server 11G.

Pre-requisites

1.       System must have minimum of 4GB RAM

2.       Oracle Database 10g (10.2.0.4 or later) OR 11G (11.1.0.7.0 or later) (Required before RCU Schema Creation)

3.       Oracle Weblogic 11GR1 (Required before WebCenter Installation)

Software Required

1.       Oracle Repository Creation Utility (RCU) 11G (11.1.1.4.0)

2.       Oracle WebCenter Suite 11G R1 PS3 (11.1.1.4.0)

Installation Steps

Installation of Oracle WebCenter consists of following three parts:-

Part1: Creating the schemas for Oracle WebCenter

Part2: Installing the Oracle WebCenter

Part3: Configuring the Oracle WebCenter

Part1: Creating the schemas for Oracle WebCenter

Oracle WebCenter requires that certain schemas exist in the database prior to installation. You must run RCU to create the schemas in the database. Follow the instructions below to create the schemas:

1.       Before running RCU, change the number of process running and process cursor to 500 and restart the Oracle DB Service.

alter system set processes=500 scope=spfile;

ALTER SYSTEM SET open_cursors = 400 SCOPE=spfile;

2.       Go to rcuHome\BIN directory and click rcu.bat. Make sure that JAVA_HOME or JRE_HOME is set in your classpath.

3.       Welcome screen

Click Next.

Welcome

4.       Create Repository Screen

Click Next.

Create Repository Screen

5.       Database Connection Screen

Enter the Oracle database details and click Next.

Database Connection Screen

A "Checking Prerequisites" screen will appear.  Click OK to proceed next.Checking Prerequisites

6.       Select Components Screen

Enter  prefix in Create a New Prefix textbox. Select WebCenter  Suite from the component list.

Select Components Screen

Click Next. A "Checking Prerequisites" screen will appear. Click OK to proceed next.

Checking Prerequisites

7.       Schema Passwords Screen

select Use same password for all schemas and enter password. Click Next.

Schema Passwords Screen

8.       Custom Variables Screen

Click Next.

Custom Variables Screen

9.       Map Tablespaces Screen

Click Next.

Map Tablespaces Screen

A "Creating Tablespaces" screen will appear.  Click Next again.

Creating Tablespaces

10.       Summary Screen

Summary Screen

Click Create. A "CREATE" screen will appear. Click Ok.

CREATE Screen

11.       Completion Summary Screen

Click Close.

Completion Summary Screen

Part2: Installing Oracle WebCenter

Unpack the installation zip file into any directory. To start the installer, go to the directory and switch to the Disk1 directory. Click setup.exe. Perform the following steps:-
  1. A command window will be open that will ask JDK/JRE home location.


2.       Welcome Screen

Click Next.WebCenter Welcome Screen

3.       Install Software Updates Screen

Select Skip Software Updates and click Next.

Install Software Updates Screen

4.       Prerequisite Checks Screen

After the prerequisite checking is complete with no errors, click Next.

Prerequisite Checks Screen

5.       Specify Installation Location Screen

Oracle Middleware Home: Specify the location where Weblogic Server was installed.

Oracle Home Directory: Specify the directory name,  it will be created inside the Oracle Middleware Home.

Click Next.

Installation Location

6.       Application Server Screen

Select Weblogic Server and click Next.

Application Server Screen

7.       Installation Summary Screen

Click Install.

"Installation Summary Screen

8.       Installation Progress Screen

Click Next when the installation is 100% complete.

Installation Progress Screen

9.       Installation Complete Screen

Click Finish.

Installation Complet Screen

Part3: Configuring the Oracle WebCenter

After you have successfully run the installer, you can configure your Oracle WebCenter components by running the Oracle Fusion Middleware Configuration Wizard.

1.       Start the Configuration Wizard from the WeblogicĂ Tools option.

2.       Welcome Screen

Select Create a new Weblogic domain and click Next.

Welcome Screen

3.       Domain Source Screen

Select the following products:-

a.       Oracle WebCenter Spaces -11.1.1.0

b.      Oracle Portlet Producers - 11.1.1.0

c.       Oracle WebCenter Discussion Server - 11.1.1.0

d.      Oracle WebCenter ActivityGraph Engines - 11.1.1.0

e.      Oracle WebCenter Personalization - 11.1.1.0

f.        Oracle WebCenter Pagelet Producer - 11.1.1.0


Click Next.

Component Screen

4.       Domain Name and Location Screen

Enter the domain name for example webcenter_domain  with default locations. Click Next.

Domain Name & Location


5.       Configure Administrator Username and Password Screen

Enter the user name and password. This user will be domain administrator. Click Next.

Administrator User Name and Password

6.       Configure Server Start Mode and JDK Screen

Select the Startup Mode and JDK. Click Next.

Configuring Server startup Mode


7.       Configure JDBC Component Schema Screen

Configure the schema information for each data source listed on this screen. When you make changes to any field on this screen, the changes are applied to selected data sources only. For fields that are common with all data sources (for example, all data sources reside on the same database), you should select all of the data sources and make your changes. The changes are saved automatically as you type.

After all of the information that is common to all data sources has been specified, then you will need to select individual or smaller groups of data sources and enter information that is specific to them (for example, the schema owner).

Click Next.

Configuring JDBC


8.       Test Component Schema Screen

Verify that the connections to your data sources are successful.

Click Next.

Test JDBC Connection


9.       Select Optional Configuration Screen

Do not select anything on this screen.

Click Next.

Optional Configuration Setting

10.       Configuration Summary

Verify the information and click Create.

Verify the Installation


11.       Creating Domain Screen
When the domain has been successfully created, click Done.

CreateWhen you create a WebCenter domain, 1 admin server (running on default port 7001) and following Managed Servers will be created:-
Server Default Port Application(s)/Component(s)
AdminServer(admin) 7001 1.       Admin Console Application
WC_Spaces 8888 2.       Oracle WebCenter Spaces.
WC_Portlet 8889 1.       Oracle WebCenter Portlets2.       Oracle Pagelet Producer
WC_Collaboration 8890 1.       Oracle WebCenter Discussions Server
WC_Utilities 8891 1.       Oracle WebCenter Activity Graph2.       Oracle WebCenter Analytics Collector 3.       Oracle WebCenter Personalization server

Installation Verification

1.       Run the admin Server

DOMAIN_HOME\startWebLogic.cmd

2. Run all the managed servers

DOMAIN_HOME\bin\startManagedServer.cmd <Server-Name>

For example

DOMAIN_HOME\bin\startManagedServer.cmd WC_Spaces

DOMAIN_HOME\bin\startManagedServer.cmd WC_Portlet

DOMAIN_HOME\bin\startManagedServer.cmd WC_Collaboration

DOMAIN_HOME\bin\startManagedServer.cmd WC_Utilities

3.       Start the browser and access the following URLs:- ·
  • To access the Administration Server:  http://<Server-Host-Name>:7001

  • To access the Administration Server console: http://<Server-Host-Name>:7001/console

  • To access Enterprise Manager:  http://<Server-Host-Name>:7001/em
  • To access WebCenter Spaces:  http://<Server-Host-Name>:8888/webcenter
  • To access WebCenter Pagelet Producer:  http://<Server-Host-Name>:8891/welcome
  • To access WebCenter Analytics, Activity Graph and Personalization Server:  http://<Server-Host-Name>:8891/activitygraph-engines
  • To access WebCenter Activity Graph: http://<Server-Host-Name>:8891/activitygraph-engines/Login.jsp
  • To access WebCenter Personalization Server: http://<Server-Host-Name>:8891/wcps/api/property/resourceIndex
  • To access WebCenter Rich Text Portlet:http://<Server-Host-Name>:8889/richtextportlet/
  • To access WebCenter WSRP Tools:  http://<Server-Host-Name>:8889/wsrp-tools/
  • To access Pagelet Producer: http://<Server-Host-Name>:8889/pageletadmin/login/loginpage.jspx
  • To access WebCenter OmniPortlet and Web Clipping Portlets:  http://<Server-Host-Name>:8889/portalTools/
  • To access WebCenter Discussions: http://<Server-Host-Name>:8890/owc_discussions

Where you <Server-Host-Name> is your machine name or IP address where you installed WebCenter.

References

Installation Guide:  http://download.oracle.com/docs/cd/E17904_01/install.1111/e12001/toc.htm

Quick Installation Guide: http://download.oracle.com/docs/cd/E17904_01/install.1111/e10146/toc.htm

Upcoming post: In my next post, we will discuss how to install Oracle Universal Content Management (UCM) (a Content Server) and Oracle Oracle Inbound Refinery (IBR) (a File Conversion server).

Tuesday, March 1, 2011

WSRP: What and Why?

WSRP(Web Services for Remote Portlets): A OASIS-approved specification designed for communications with remote portlets.  WSRP allows portals to display remotely-running portlets inside the portal pages without doing any additional programming.  This means that the portlets can run on one server or container and the portal itself can run on another. Portal and portlet communicates with each other using SOAP-based Web Services standard.  Due to WSRP portability, Java portal site can also communicate with .NET portlets as long as they communicate via WSRP and vice versa.

You can develop WSRP portlets using Oracle WebCenter framework, IBM portlet factory, Liferay portal, .NET Portlet Toolkit etc.


Why do you need WSRP? If Web services offer a mechanism to create platform-independent services, and JSR-168/268 defines a standard by which to develop portlets, why do you need WSRP? The answer is simple. While Web services give you the ability to reuse back-end services, WSRP lets you reuse the entire user interface!

Friday, February 18, 2011

Why do we need JMS?

What is JMS(Java Message Service)?

A specification (API)  that describes a common way for Java programs to create, send, receive and read distributed enterprise messages. Its basically meant for object communication in multithreaded & heterogeneous environment.

It enables
  • loosely coupled communication (not like RMI or CORBA)
  • Asynchronous messaging
  • Reliable delivery (a message is guaranteed to be delivered once and only once)


Best examples where we can use JMS are “Enterprise Chat Application” & “Stock Trading Application”.

All the major vendor (IBM, Oracle, Apache, Google etc) has given its implementation. Its also available as a add-on of application server like Oracle Weblogic Server, JBOSS etc.

Why do we need it?

It will be useful when you are writing some event based applications like Chat Server which needs a publish kind of event mechanism to send messages between the server to the clients who got connected with the server.

Its different from RMI, in JMS there is no need for the destination object to be available online while sending a message from the client to the server. But in RMI it is necessary. So we can use JMS in place of RMI where we need to have loosely-coupled mechanism.

Conclusion

JMS is the distributed enterprise messaging API. You can use these API in order to develop your own application or you can 3rd party implementation like IBM MQServies.  We will choose JMS if there is a requirement of enterprise messaging application that requires to send/receive huge number of messages in reliable environment.


Thursday, November 4, 2010

Struts2 Analysis

Recently i got the chance to work on struts2. Briefly, its a J2EE MVC web framework like struts-1, JSF, ADF etc. During development, I found following its pros and cons:-

Pros:
1. Excellent support for Spring, Freemarker, Tiles, AJAX, JQuery etc.
2. Very easy to understand as compared to Struts-1, JSF & ADF
3. Highly configurable & extendable framework
4. Builtin support for token generation,Internationalization etc
5. Good abstraction away from Servlet/JSP
6. Struts2 tags are simpler to use
7. Good builtin Validation framework
8. New version of MyEclipse 8.6 has builtin support for Struts2
9. Good management of properties files like global level, package level and action level

Cons:
1. Poor documentation.
2. Struts2 themes make the framework harder to understand and slower. In order to develop or update themes, someone must know Freemarker language.
3. Immature internationalization support.Tags not fully support of localization.
4. Interceptors are not flexbile enough as compared to Filter. As you can not define interceptor in web.xml alongwith parameters.
5. No builtin pagination and data grid support.
6. Problem in localization for display tag